Monday, May 27, 2019


How to Grow Your Own Mushrooms


Are you unhappy about high prices for grocery mushrooms? Why not become more self-sufficient and grow your own Champignons, Portobellos, Oyster or Shitake mushrooms! Only Porcinis cannot yet be cultivated in the garden.


Finished cultures
Prepared cultures are the easiest way to cultivate mushrooms. It is particularly suitable for beginners, or mushroom friends, who would like to try cultivation. The finished mushroom cultures consist of a substrate block of sawdust and some additives - all in all for approx. 10 - 30 dollars.

Follow the Instructions!
Don't worry, it's easier than you think!  Usually, the substrate block simply has to be cut or cut open. Sometimes, however, it can also be removed completely from the bag. For some mushroom types, the soil has to be mixed in.  Through contact with oxygen, the fungus growth is stimulated.  The block is set up at 10 to 20° C in the house or garden. It is important to moisten it regularly. The bale should not dry out. Don't place it in full sun! The first mushrooms can often be harvested after only four weeks. Sometimes, however, it takes up to 12 weeks.  Depending on how large the substrate volume is, up to three further harvests can follow.

Mushroom Brood
Mushroom spawn is available in different forms, depending on whether you want to grow it on wood, straw or various substrate mixtures. The so-called grain brood is very popular. The mushroom netting is spun around grain or millet grains.  These organic nutrients are the food basis of mycelium.  The advantage of the grain brood is that it can be mixed very well under substrates. In addition, the culture can be easily packed in cans or bags. Grain spawn is particularly popular for professional mushroom cultivation and the inoculation of strains.  The substrate brood uses fermented, marbled straw flour, straw chaff or simply sawdust instead of grains.

Generally, straw bales or soaked straw pellets are larded with it.  The mass is simply broken up, for example into nut-sized pieces, which must, however, be streaked with mycelium.

Mushroom brood should be used quickly after purchase or delivery. However, at temperatures between 2 and 12° C it can be kept for several weeks or months. The lower the temperature, the longer the shelf life. It is important that bacteria or mold spores do not come to the brood at any time. Therefore, it is safest to always wear disposable gloves when handling the fungal brood. If infected with any pathogens, the entire brood can die.

Straw Bales
Mushroom cultivation on straw bales is best suited for oyster mushrooms and brown caps. It is also suitable for rose mushrooms and lime mushrooms. This type of cultivation does not work with other mushrooms. A rod or grain brood is used.

A pressed, untreated straw bale is used for this mushroom cultivation.  Wheat straw or barley straw is the most suitable.  The bale must not be too old, maximum one year, not older. It is important that nothing is damp and there is no mould. For the beginner, the size of 50x50x100 cm is completely sufficient.

The best time to start breeding is in April or May. The bale is soaked for two days in a rain barrel, an old bathtub or another sufficiently large and suitable container. Clear tap water is used. Then the bale has to drain for a whole day. It must not be too wet. More preparation is not necessary. Now the rod or grain brood can be spread.


  • Drill holes in the bales with a planting wood, distance about 20 cm
  • Put the brood in the holes, at least 15 cm deep
  • Close the holes again


Once the entire bale has been provided with larvae, it is covered with a foil. The film increases the humidity and provides the mycelium with ideal growing conditions.  It is even better to wrap the whole bale with foil. Lack of oxygen promotes mycelium growth. However, watering is a bit laborious.

Optimal growth conditions for the mycelium offer temperatures between 20 and 25° C, with constant humidity

After 5 to 6 weeks the bale is penetrated by the mycelium. The straw must now always be kept moist, but never too wet. If everything goes according to plan, a fine web will appear after about 3 weeks.  Already three weeks later can be harvested for the first time.

Usually, there are 2 to 3 further harvests, always at intervals of 3 to 4 weeks, but this also depends on the weather.  Thus, about 6 kg of mushrooms can be harvested from one bale.  After that, the straw is exhausted and can no longer provide food for the mycelium.

Mushrooms Harvest on the Balcony
If you don't have a garden, you can grow mushrooms on the balcony. You can use pots filled with straw pellets. The pellets must also be moistened in a larger container and swell until they fall apart. Then water is added and stirred until a pulp is formed. The substrate brood is evenly distributed in this.

The mass is distributed in pots or other vessels which must have a water outlet at the bottom and which are sealed with foil. They are left standing for 6 to 10 days, preferably not too light, rather shady. During this time the mixture ferments. Make sure that the mixture is moist but not wet. Excess water must be able to drain off. Do not use a coaster. After four to six weeks you can harvest for the first time.

Mushrooms are not only low in calories and fat but are rich in B vitamins, as well as other nutrients that can improve our skin and help us feel less tired, according to health experts.

Happy Growing : )

.
<><><><><>

.

Sunday, May 19, 2019


Glyphosate in Protein Products on Amazon


Glyphosate Discovered in Top Selling Organic Pea Protein Products on Amazon
The results shocked us all - USDA Organic certified pea protein powder products had high levels of glyphosate in!


The Highest Levels of Glyphosate:

- ORGAIN Organic Protein™ Plant Based Protein Powder – Natural Unsweetened


- Anthony’s Pea Protein (84% Protein) from Germany

The Detox Project has been promoting the gold standard testing of human and food samples from around the world for the last 5 years and we are now using this expertise to increase transparency for consumers everywhere. The project has also proven how they can help brands clean up their supply chain!

Read more:
https://detoxproject.org/reports/

.
<><><><><>

.

Monday, May 13, 2019


The Botanical Garden in Mobile, Alabama


The Spring Hill area in the north-western part of Mobile, Alabama, is one of the most lovely parts of the city.  And right in this lush and hilly residential area is Mobile's botanical garden located. 

In March I had the pleasure to visit this over 100 acres of an extended treasure.  It’s a wonderful blend of cultivated areas and nature trails.  Best of all: Dogs on leashes are allowed in this lovely area.  Huge pines allow for welcoming shade and add acidic soil which is favored by the Azaleas and Rhododendron shrubs and trees.


How Camellias Came to Mobile
Wandering the woodland trails was especially delightful as the Camellia blooms were at its peak: from white to light pink into mauve, purple, and maroon. Camellias are believed to have first arrived from Europe through the Port of Mobile nearly 200 years ago.  But the inspiration for today’s K. Sawada Winter Garden really began in 1910 with the arrival of a Japanese immigrant.
Kosaku Sawada, fresh from horticulture school in Osaka, had journeyed to America with big dreams to start a small nursery in 1914 - growing a plant which is well known in his native homeland—Camellias!  Many years of painstaking work followed, during which Sawada said only a small number of seedlings from two separate years—1925 and 1931—produced flowers worthy of public distribution.


The Camellias’ “competition" is the Azaleas, who showed off with lovely color shades that went from yellow to light orange, copper, and into the pink color wheel.

Other Garden “Rooms”
Discover the Fern Glade, Fragrance and Texture Garden, Herb Garden, Japanese Maple Garden, Rhododendron Garden, and collections of hollies, magnolias, roses, and the perennials, as well as 27 acres of longleaf pine habitat.  You might spend a whole day in this lovely environment...


Lots of Events and workshops/classes are offered to garden enthusiast and those with a green thumb. Amazing: the fee to visit the garden is only $5.  Most botanical gardens charge three times this amount.

A pity only that I missed the plant sales which are taking place every Saturday morning from March 30-June 29, and then again in October. Maybe next year…


Best time to visit the Magnolia garden and the Rhododendrons is late February.
http://www.mobilebotanicalgardens.org/hours-and-admission/

.

<><><><><>

.

.

.

Wednesday, April 24, 2019


Organic Gardening vs Glyphosate - RoundUp


Last Fall this research shocked the Nation: Glyphosate in your breakfast cereal. Tests detected glyphosate in all 28 samples of products made with conventionally grown oats by General Mills (Cheerios), Quaker and Pepsico.

Cheerios, Peanut Butter Bars, or Granola Oats, Honey & Almonds, were some of the worst products with the highest concentration of glyphosate. One could also exclaim: “Want to kill your kids? Just feed them Cheerios.”

I am wondering when EWG will test California wines: I spent a couple of months in the Napa and Sonoma valley and have seen them constantly spraying their vineyards with RoundUp. American soil is soaked with Glyphosates…

With the garden season now in full swing, here is a reminder for gardeners and commercial “landscapers”:

In the journal “Scientific Reports”, the researchers say they saw “dramatic increases” in several pathologies affecting the second and third generations. The second generation had “significant increases” in testis, ovary, and mammary gland diseases, as well as obesity. In third-generation males, the researchers saw a 30 percent increase in prostate disease – three times that of a control population. The third generation of females had a 40 percent increase in kidney disease.

Skinner and his colleagues call this phenomenon “generational toxicology” and they have seen it over the years in fungicides, pesticides, jet fuel, the plastics compound bisphenol A, the insect repellant DEET, and the herbicide atrazine. At work are epigenetic changes that turn genes on and off, often because of environmental influences.


What Can You Do as a Gardener?
Never, ever, use any glyphosate products, such as RoundUp or the Weed b’ Gone. Pour boiling water over any weeds cropping up in your driveway. Do it on a hot and dry day, and they will die in minutes.

Weeds in the lawn can easily be dug out. And Dandelions are edible: their leaves are very tasty, mix them in your salad. Make Dandelion wine from the blooms and roast the roots as a vegetable side dish.

Way healthier than breakfast cereal or Granola Oat bars...


.


Tuesday, March 26, 2019


Iconic Tree of the Southern States


My second-most admired tree in the southern States of Florida, Alabama, Mississippi and Lousiana are the "Bald Cypress". I discovered this tree during a walk in a residential area in Florida, and the owner gave me its name.  When googling it, I realized that these are the legendary “swamp trees” in countless photographs I have seen before.

It’s hard to mistake the Bald Cypress (Taxodium distichum) for any other tree. These tall conifers with flared trunk bases are representative for the Florida Everglades and Louisiana - where it is the State Tree.

They prefer to grow in swamps and bayous of the southeastern United States from Maryland to Texas.  You will notice them later in the year for the beautiful russet-red fall color of its lacy needles.


These trees can also thrive in drier, upland soils in plant hardiness zones 4 through 9 - if watered well.  The soil should be very acidic, moist and sandy. Irrigate regularly.  Its delicate, feathery foliage is sage green when new, turns to copper-gold in autumn and then falls with the first frosts, leaving the tree "bald."

It is a large, slow-growing, and long-lived tree. It typically grows to heights of 35–120 feet (10–40 m) and has a trunk diameter of 3–6 feet.  Plant them at least 50 ft apart if you plan a group to allow “air” between the trees.  The tallest know specimen can be found near Colonial Williamsburg, Virginia, with a height of 145 ft. The oldest known living specimen, in Bladen County, North Carolina, is over 1,620 years old.

Bald Cypress Shade trees are available in Nurseries and garden centers, starting at ca. $70 for an 8 gallons pot. It might grow from 1 to 2 ft per year in favorable conditions.
.

.
Teo Spengler from SFGate explains how to grow them from seed - if you have patience:
Harvest bald cypress fruits on the ground beneath the tree in autumn. Look for round cones that have not opened. Store them in a warm location to dry for several weeks.

Break the cones into small pieces, each containing one or more seeds. Separating the seeds from the sappy cone segments is very hard, but you can plant them together.

Fill the bottom one-half of a plastic bag with wet sand. Place the seeds and cone pieces into the bag with the sand. Store the bag in a refrigerator for two to four months at a temperature between 30 and 50 degrees Fahrenheit.


Fill a planting tray with wet sphagnum moss. Remove the plastic bag from the refrigerator, and take the seeds and cone pieces from the plastic bag. Sow the seeds and cone pieces in the wet sphagnum moss. Press each seed and cone piece until it is 1/2 inch below the surface of the moss. Sow 10 seeds for every one tree you wish to grow. The germination rate for bald cypress seeds varies greatly. Saturate the moss with water, but do not flood the seeds. Maintain the wet condition of the planting medium until the seeds germinate, which generally takes one to three months.

Read more here:
https://homeguides.sfgate.com/propagate-bald-cypress-68246.html

.
<><><><><>

.

Saturday, March 16, 2019


Tropical Plant Curcuma - the New Garden Star


Curcuma is an eye-catching perennial with a tropical feel. It pairs nicely with other tropical plants, like hibiscus and elephant ears. The plant prefers plenty of water so it would be a nice companion planting on the same watering schedule as the elephant ear.

The name comes from the Sanskrit kuá¹…kuma, referring to turmeric. Turmeric has been used in India since ancient times as a substitute for saffron and other yellowish pigments.

For garden planting, choose a location that has a fertile, moist soil with good drainage that receives a little early morning sun or bright filtered shade all day.  Tubers should be planted about 1.5'' (4cm) deep and completely covered by soil to remain moist for good sprouting.  Optimal temperature is between 20-30 degrees Celsius.

.

.

Winter Care of Curcuma in Cold Climates
Costa Farm’s website gives this advice: “If you live in a cold-winter area, you’ll need to bring your Curcuma indoors to protect it from the chilly conditions. Curcuma needs to go dormant, so you can’t treat it like a houseplant. Rather, you’ll need to store the tubers in a cool, dry place."

"For Curcuma planted in the ground, carefully dig the tubers in fall, when the plant’s foliage begins to turn yellow. Gently clean loose soil from the tubers, then let them dry in a warm, sunny place for a day or so. Once the tubers are dry, store them in a container with coarse sand or peat moss. Don’t seal the container -- let it breathe. It’s best to store Curcuma tubers in a cool place (50F/10C) over winter. You don’t want the tubers to completely dry up over winter, sprinkle just a small splash of water in the sand/moss periodically."

For Curcuma in pots, you can stop watering the container once the foliage starts to go yellow. Let the potting mix dry, then store the entire pot in a cool place (50F/10C) for winter. Sprinkle just a bit of water in the pot a couple of times over winter so the tubers don’t completely dry out. Bring your Curcuma back outdoors to a shaded or partly shaded spot in spring after all danger of frost has passed.


See Beautiful Curcuma Plants in this Video:

Friday, February 15, 2019


Winterberries - a Splash of Color in the Darkest Time of the Year


On my yearly pilgrimage to sunnier shores, I enjoyed the lovely colorful shrubs before leaving Nova Scotia, Canada. Then I met them again everywhere around the Appalachians and then - o wonder - in NW Florida.  They can be seen in gardens and in the wild.  In December they are perfect for attractive winter bouquets, mixed for example with dark-green Pine or Boxwood twigs.
.

.

Ilex verticillata – the American winterberry – is prized as an ornamental plant in gardens for the midwinter splash of bright color from densely packed berries.  Winterberries grow from Hardiness Zones 4 to 9 in the Eastern part of North America.

.


Winterberries are easy to grow, with very few diseases or pests. In July they are showing white blooms. Berries appear from November on.  Although wet acidic soils are optimal, the winterberry will grow well in the average garden.  Important: At least one male plant must be planted in proximity to one or more females for them to bear fruit.  For best color impact, plant five or seven shrubs in a group in your garden.


Thursday, January 31, 2019


10 Commands for Happy Gardeners


Less work - more fun guaranteed: Here are 10 Tips on how to make your garden as enjoyable as possible - without the hard work - creating a carefree garden - but with a sustainable approach.

1. Borders
2. Healthy Soil
3. Lots of Compost
4. Location, Location, Location
5. Keep Your Distance
6. Shade and Sun
7. Mulching
8. Water Smart
9. Prune, Prune and Prune More!
10. Avoid All Chemicals and Poisons


1. Borders
One of the most important tasks for new and old gardens is to create borders between flower or vegetable beds and walkways or lawns.  As better garden beds are "bordered" as fewer weeds can spread.  Another aspect is water or soil overflow which can be prevented through borders.  Never, ever use plastic!  Not only is it an unnatural material, but it also looks ugly and often it is too low to get a stronghold in the soil.  It might also break as it is exposed for a long time to sun, frost and frigid temperatures.


Stone borders, at least 8-10 inches high and placed at least 4 inches deep into a layer of stone sand or concrete are the best solution. This will prevent weeds and grass from creeping into the flower beds or walkways.  To remove weeds on a walkway, just pour boiling, hot water over the weeds.  Do it on dry soil, on a warm dry day.  The weeds will immediately die down and wilt.  You can also do this with boiling water and added salt or vinegar.  Especially difficult are walkways that consist of small gravel.  They need higher borders to avoid gravel stones flowing into the lawn or flower beds.  See a video here how to install it: https://www.youtube.com/watch?v=BlucSy6dmSM

Cover the soil of the flower beds with a 3 to 5-inch layer of mulch to discourage new grass seeds from germinating.  But before applying the mulch, weed the flower bed and spread a thick layer of cardboard on the bare soil before adding the mulch.

Another way is to cut into the sod along the line to a depth of at least 6 inches, this way creating a deep edge.  However, it needs to be tended and newly cut at least twice or three times a year, depending on the soil, the rainfall and the spreading of the lawn or other plants.  It will not work near trees as their roots often spread for meters and are close to the surface.  Roots from older trees often make it impossible to edge.  After mowing, trim edges with long-handled edging shears, to cut grass the mower couldn't reach.  Don’t use a snipper, as it would spread the grass pieces (and maybe weeds) into your flower beds.


It's much easier to control your garden if it has definite boundaries.  Containers provide the ultimate in control.  You control the soil, water, exposure and even limit the growth of the plants in the container.  Moreover, you can move the containers wherever you want.
Raised beds, for example, to grow vegetables, separate the garden beds from their surroundings.  Ideally, lift the beds up by 6 inches or more.  You'll have the benefits of controlling your borders and you'll be saving your back from some bending.

Don't forget to create “garden rooms”, add a focal point like a birdbath, fountain, arbor, pergola, large rock, or a garden statue.


2. Healthy Soil
Start with great soil and you'll wind up with great plants.  Nutritious soil and sufficient water are a MUST: No matter where you garden - in shade or sun - your plants will only thrive when you feed them well with the right soil, lots of compost and regular water. Especially near or beneath trees and large shrubs moisture is crucial.  Trees take up all the nutrients and moisture (and even prevent rain reaching the soil), so there is nothing left for your attractive flowers - if you don't soak the soil frequently.


Healthy plants get fewer diseases, attract fewer insect pests and require less water. Plus, you won't have to remember to fertilize every other week.  Start with a good analysis of your existing soil. You can have all the essential nutrients tested or just the pH.  Many nurseries provide this service.  If your soil is deficient in any minerals or nutrients, amend the soil according to recommendations.  Then keep adding organic matter, like compost, regularly.  A good soil mixture I am using is one-third black soil, one-third compost and used coffee grounds, and one-third composted manure (chicken, cow or sheep manure).

Slow release, organic fertilizers can help supplement deficient nutrients.  But feeding plants with synthetic fertilizers can actually destroy the beneficial organisms and organic matter within the soil and only provide a short fix.  It's like turning your garden into a drug addict.  It will need regular doses of fertilizer and more and more to get the same effect.

Covering the soil with natural cedar mulch has a profound effect on your gardening success.  Place a 6-inch thick layer of mulch to even out temperature difference, to avoid weeds and yes, reduce watering.


3. Lots of Compost
It’s so easy to compost your kitchen scraps! I am spreading two layers of newspaper on my counter and peel fruits, vegetables, and potato peels directly on this paper and wrap it, before throwing into the compost heap. This way, possible liquids are soaked up and some of the necessary dry material is guaranteed. If you don’t subscribe to a newspaper, use flyers or paper shopping bags, or even cardboard egg cartons.


Composted organic material, such as dry leaves, grass clippings, shredded paper, fruit and vegetable scraps, eggshells, tea and coffee grounds, pieces of toilet paper rolls, dryer lint, straw, used paper towels or napkins, shredded leaves, pieces of egg cartons… the list goes on and on. I am wrapping these items in two sheets of newspaper, so they won’t ever smell when composting. In winter I keep a paper shopping bag in the garage and throw my newspaper compost parcels every day into the paper bag. Come spring, I bring these bags to the compost heap.


There are several ways to “ignite” the composting process and adding microorganisms into the compost.  I usually dig a hole in the garden bed, approx. one foot deep and one foot wide. I fill it half with compost, then sprinkle some soil over it, then fill the rest of the compost material up and on top a thicker layer soil.  With a stick, I poke some holes into the compost hole (for better airing).  On top, I place a piece of chicken fence to hinder animals, such as rodents or raccoons, to dig in.

The “classic” way is a large plastic composting bin, but there are several reasons not to use them: the composting materials don’t get enough air, and these bins are too deep to easily turn the material.  As plastic is very adverse to the environment, I would never use any of these bins. These bins will not dissolve in ten-thousand years! Much better (and less expensive) is it with the set up a compost heap in your backyard. Just hammer four posts (about 2-2,5 feet high) into the soil (4-6 ft area), roll sturdy metal fence around and cover it also with a fence to keep animals at bay.  This way your compost gets a lot of air, and you can easily turn it from time to time with a fork.  Sprinkle a bit soil every time you add a pale full of compost material to start the process faster.  I also like to catch earthworms and place them into the compost to do their work.  They are my unpaid employees - working 24/7/365 on my garden fertilizing material.

Benefits of Compost: Compost provides many essential nutrients for plant growth and therefore is used as fertilizer.  Compost also improves soil structure so that soil can easily hold the correct amount of moisture, nutrients, and air.  It also encourages the production of beneficial bacteria and fungi that break down organic matter to create humus, a rich nutrient-filled material.  Compost is better for your plants than any artificial fertilizers.  And most important: it reduces methane emissions from landfills and lowers your carbon footprint. Plus - composting is fun, and saves you time and money.


In autumn, lose the existing soil on top with a garden fork, and add a layer of two inches of compost or composted manure for additional nutrients.  Then add a six-inch (15-cm) layer of shredded leaves (or natural cedar mulch) to improve the soil’s tilth and texture.


4. Location, Location, Location
Just as in real estate, the location of plants in your garden is immensely important.  No shade-loving flower will thrive in full sun and dry soil.  And roses underneath a huge maple tree or tucked into the darkest corner of the garden will not bloom at it’s best.

Before you purchase any plant always check their label carefully, it will tell you exactly the best location, or google nursery sites on the internet.

Group plants by their needs I'm sure you've heard the saying "Right plant for the right spot."  Of course, you're going to want to put sun lovers in the sun and ground covers where they can roam.  But consider how efficient it would be if you put all your water hogs together so you could just turn on the sprinklers or drag the hose to one area and be done.  The same goes for plants that require a lot of deadheading or vegetables that need to be harvested daily or hourly, like zucchini.  You can still mix in different bloom times and variations in color, form, and texture.  It's just the heavy maintenance chores that should be consolidated.


But location is also important when it comes to a plant's size. Large shrubs or perennials look better as background plants, and smaller flowers should be more to the front.

Another consideration might also be the blooming time. Don’t place all flowers or shrubs that are blooming, for example, in May into one spot - while in the rest of your garden has no color to show.

Always plant at least five or seven of the same annuals or perennials in one group. Single plants just look kind of lost… They make no impact, and your garden looks a bit cluttered.

Even shrubs or trees are more attractive when they are planted in a group of at least three.  In natural landscaping, trees should always be grouped together in multiples. Compare it to nature: there is always a group, sometimes a whole forest of the same trees, and shrubs or bushes appear mostly in a number of species.


5. Keep Your Distance
The spacing of landscape plants makes the difference between a well-groomed yard and an overgrown jungle.  Never be afraid of empty spaces.  The opposite: it’s leading the attention and visual interest to the existing and blooming plants.  If you really want to fill it up, get groups of blooming annuals and plant them in the empty spaces between your perennials.


Even landscape contractors from the city or nursery companies can be found to make these errors: planting to tight.  Walking in a park or through residential areas, one will detect many of these errors.  It is very easy to find out how far apart to plant flowers, shrubs, or trees: Just read the label.  It tells you the mature height and width of the plant. Add to this width a foot between flowers, or two feet between shrubs, and three feet between the width of trees.

How far away from your house should you plant a tree?  Large trees, up to 70 feet or more should be planted at least 30-40  feet from the home, medium-sized trees up to 40 feet tall, 25-30 feet from the home, and small trees 20 feet tall or less, 20-25 feet from the home.

The average tree has as much mass below ground as it has above ground?  Most of the mass of a tree’s root system is in the top 18-24 inches of soil.  The roots spread at least as far as the most distant tips of the branches, and invasive tree roots often spread much farther and can be very destructive.  Trees that have invasive root systems invade pipes.  Especially Willows, American Elm, and Silver Maple should be planted far away from the house.


6. Shade and Sun
Analyze the shade more carefully: Bright shade, morning shade, full shade, dry shade, shade from buildings, shade from deciduous trees.  Shade is not shade… it might be a little complicated.


Shade from a building is the easiest to find plants for.  A wide range of plants will grow well in areas shaded for all or part of the day by a shadow from a house or taller building. The reason: the sky overhead is not obstructed, so plants still receive a full spectrum of light, containing all the wavelengths needed for growth.  The only difference is that the light is less intense.  You can plant almost all flowers and shrubs that have the word “shade” in the label.


Shade from deciduous trees allows Japanese maples, Camellias, Rhododendrons, and Azaleas to thrive.  It is also a perfect place to plant early Spring bloomers, such as Daffodils, Hyacinths, Tulips or Snowdrops to bloom before the tree leaves are sprouting and the full summer shade arrives.  All other plants in this dappled shade need to be “shade-loving” - for example, Astilbe, Bleeding Heart, Heuchera, Hostas, Siberian Iris, Bigroot Geranium, Anemones, Shooting Stars, Trilliums, Japanese Forest Grass, Primulas, Periwinkle. 

Annuals that tolerate dappled shade include Pelargoniums. Begonias, Impatiens, Lobelia, Pansies, Coleus, Caladiums, and Curcuma.  Shrubs that thrive if the shade is not too deep: Mock Orange (Philadelphus), Hydrangeas (PeeGee, Annabelle, Climbing Hydrangea) and Rosa Glaucia with its lovely blue-green leaves and light pink flowers.


Dry shade is almost always the result of mature trees with roots that run close to the soil surface, taking up water before it has a chance to reach other plants.  When installing perennials in these demanding conditions, add plenty of composted manure to the planting holes.  It’s easier to plant in individual holes, rather than trying to dig an entire bed at once, and smaller plants get off to a stronger start than larger ones because they adapt to coexisting with tree roots more easily.  Tolerant of dry shade are very few plants, best do Hostas in all color variations, especially Blue Hosta.  Avoid the green varieties as they are not very attractive among all other green shades.  Other choices are Periwinkle, big-root Geranium and Japanese Spurge, planted in big groups to fill the spaces, especially close around tree trunks.


Sunny Garden Beds: Many full sun plants are also tolerant of drought and arid conditions, making them ideal for potted environments too.  Nevertheless, don’t let them dry out, regularly water the soil (no water overhead the plants or god forbid the flowers!)

Plants that thrive in full sun - at least 5 hours - include Lavender, Yarrow, Daisy, Purple Coneflower, Coreopsis, all types of Sedums, Lambs Ear, Aster, Iris, Salvia, Artemesia, Peonies, etc.  Annuals include Petunias, Zinnia, Canna, and Geranium.  And almost all vegetable types.  For seasonal interest within your containers, try planting different types that will bloom at various times so there is always something in flower.  No matter of sun or shade: stick to low-maintenance flowers with long bloom times!


7. Mulching
Walking through a forest or hiking in the countryside you will see bare soil pretty seldom. Nature mulches itself!  In Fall, dry leaves tumble down to the ground, covering the ground. In Winter lots of needles from Pine, Fir, and Tamarack trees cover the area.


Mulching not just suppresses weeds and slows down moisture evaporation, but should also break down into the underlying soil gradually and thereby improve the soil’s texture.  A thick layer of mulch helps moderate soil temperatures.  Mulch serves as a buffer from soil compaction caused by rain and helps prevent the crusting-over of bare soil that can sometimes prevent moisture from being absorbed.

The ideal mulch is the one, made from natural Cedars.  It has a wonderful smell, especially after the rain.  Cedar mulch is quite long lasting and breaks down over time to provide added nutrients to the soil.  Cedar mulches also discourage, repels, kills or can inhibit insects from taking up residence in the garden, thus making the use of insecticides unnecessary!

Other products to mulch are shredded (with a lawnmower) leaves or like in the southern US States, Pine needles.  Always add mulch at least 6-8 inches high for best results.


Never buy those “mulches” that are color-stained, and are sold by chemical companies
The large scale manufacturers of colored mulch use iron oxide to dye their red mulch and carbon black for their black mulch - which are sometimes toxic.  The wood which is used for these products is not Cedar, but debris from felled city trees.  These additives will stain your clothes, gloves, and hands.  They are not adding any nutrition to your soil.  CCA pressure-treated wood should never be used as mulch because one of the ingredients that make up the CCA (chromated copper arsenate) is arsenic, a poisonous substance, and a carcinogen.


8. Water Smart
How often you water your garden depends on the climate where you live, the soil type, if your plants are in shade or full sun, how large the plants are and if they have shallow roots, such as vegetables.

One important rule: Water the soil - never, ever water overhead the plants or blooms!  You might say: Rain also pours water over my plants.  Yes, true - but rainwater is much “softer” as it doesn’t get all these chemical treatments that city water receives.  One more reason to collect rainwater...

Test your soil before and after watering: Use a small hand trowel (or just a spoon), scoop a handful of soil and try to form it into a ball.  Should it not keep its form and fall apart, the soil is too dry or contains too much sand - or both.


After watering, dig about 5 inches deep to see how deep (or low) the moisture went.  Better water once or twice a week thoroughly (depending if it rains or not).  Early in the morning, before the sun rises, is the best time of day to water the garden.  It’s still cool outside, which allows the water to run down into the soil and reach the roots of the plant before excess water is lost to evaporation.

A soaker hose is the ideal watering tool. Soaker hoses deliver water slowly, close to the plant roots.  After dragging for years heavy watering hoses around, and sometimes got holes that needed repair, I finally found the perfect hose: extremely light-weighted and 100 ft long.  I could carry the complete hose with one small finger.  When I purchased the hose, it cost more than $100, in the meantime, you can get them for $40 at Amazon.
http://garden-dream.blogspot.com/2016/07/the-greatest-garden-hose-ever.html

Potted plants need way more watering, especially if they are placed in the sun. Get someone to water your garden when you are away. If that’s not possible, fill plastic water bottles, freeze them overnight, and poke a small hole in the lid. Dig the bottle, upside down three to four inches deep next to the plant.  After a day or two, the water is melted and very slowly drips into the soil.  Another trick to water shrubs is to cut off the bottom of a plastic water bottle and poke a hole into the lid.  If there is any rain after the bottle is empty, the rainwater will be directed to the plant.


9. Prune, Prune and Prune More!
The terms pruning and trimming are often used interchangeably, but surprising to most, there is a difference between the two.  When you are removing the dead, loose, or infected branches or stems from its respective plant, you are pruning.  Trimming, on the other hand, occurs when you are cutting back overgrown plants.


Hand pruners are a gardener's best friend! Buy the most expensive pair you can find. Don’t skimp on the most important tool in your garden.  Believe me, I tried them all - from $3 to $80.  The cheap ones all broke, and some of the expensive ones I lost… I never walk into the garden without pruners.  And I am in the garden every day!  To check on my perennial flowers.  I barely ever buy annuals.  Perennials are so enchanting, versatile, inexpensive and can be propagated for years and years.  Perennials need only to be pruned once their blooms are spent. Don’t delay as they will bloom again in late summer/fall when cut right away.  At the end of the garden season, perennial flowers are best cut down in the fall.  If they are diseased, throw the foliage away, do not compost it.

Perennials are not the only plants which need to be pruned: shrubs need the treatment at least once a year.  They can be pruned up to a third per annum.  If you start doing it from the first year on, you won’t have bare twigs or stems later on.  Pruning and trimming shrubbery improve the health and strength of a plant.  Pruning deciduous plants in the winter promote fast regrowth in the spring, as most plants are dormant during the winter.  It's also easier to see the shape of deciduous plants in the winter since their foliage is gone.  An exception is spring-flowering blooms, such as Lilacs, Witch Hazel, Quince or Tree Peonies.  They need to be pruned just after they bloomed, in late spring or early summer as they build their buds for next year’s blooming.

One important rule when pruning: Make the cut in a 45-degree angle, never cut straight horizontally.  A sloped angle lets the moisture run down and not trap it on the surface.  Also make your cuts if possible 1/4 inch above the bud, sloping down and away from it.


10. Avoid All Chemicals and Poisons
There are so many natural ways to solve problems in the garden or the house - no need to use poisons.  Remember: “Convenience Kills”.  Pest control will not only kill ants, moles, mice or rats.  Especially against the annoying slugs, poisonous grain is widely scattered. It will be a death sentence, not only for these critters but also for cats and dogs… All these poisons - as well as the dangerous glyphosates, such as Round-up, should never be used in a garden.  They will penetrate the soil, will be washed away by rain, and flow into rivers and lakes.  We eat fish and seafood and ingest these poisons in small amounts, year for year.  Glyphosates may contribute to Lymphoma: Non-Hodgkin, DNA damage, and Hormonal Disorders.  Do you want to take the risk of cancer?

Easy and mostly free methods, such as pouring boiling water, hot vinegar or ice-melting salt on weeds that invaded driveways or a garden path are working more efficiently than Weed b’ Gone or Roundup. Plus, they are better for your health and the environment.

Thick layers of mulch and edging, or much better: creating borders help to keep weeds out of flower beds.

How to solve unwanted pests:  Mix borax, sugar, and a bit of water, make a thin paste, against ants and other bugs. They’ll eat it and take it back to their colony, feeding their breed.  None of them might survive it.  The website “Home Remedies To Get Rid Of Mice and other Critters Naturally” gives lots of tips for this problem.
https://how-to-get-rid-of-mice.com/natural-home-remedies/
Read also: Poisoning Your Soil: Are Gardeners Really “Green”?
http://garden-dream.blogspot.com/2019/01/poisoning-your-soil-are-gardeners.html


Don't Forget to Smell the Roses!
To stop and smell the roses means: relax, do take time out of one's busy schedule to enjoy or appreciate the beauty of your garden. And that’s what gardens are for: a means to make you happy. Not something to work on hard!

Show your children and grandkids early in life how much fun and how exciting gardening is.  They might even enjoy deadheading the petunias.  Planting, harvesting, learning what's a weed, collecting insects - these are all activities that will get them out into the garden.

Don’t work for hours and hours on a weekend in your garden.  You will be exhausted and curse your green space.  Rather walk your garden every evening, sit down or lay down and “smell the roses”.

Water the ground, pick some weeds or prune spend flowers.  But don’t spend more than 20 minutes on this.  Use your time to contemplate and marvel on your colorful flowers and shrubs.  Enjoying your flower garden is a sensory experience.  Growing flowers allow you to enjoy nature, including birds, butterflies, bees, and other pollinators that naturally migrate to nectar from the blooms.


Be smart, take my tips - and become a happy and eco-friendly gardener!
.

<><><><><>


Wednesday, January 23, 2019


Poisoning Your Soil: Are Gardeners Really “Green”?


Even though more and more "organic" items are offered in grocery stores, yet in the garden or on balconies too often chemicals are in use. Retailers are required by law to provide expert advice on the correct use of poisons or weed killers. That's why the chemicals are trapped behind glass in the stores. However, test purchases for the program "planet e." show: In fact, there is often no counseling at all. 

.
Pollutants:
Garden tools with a gas engine.  Their pollutant balance is indeed significantly worse than the modern car engines.  A two-stroke engine mower emits just as many pollutants per gallon of gas consumed as a 1930s car.  In addition, the exhaust gases are considered to be clearly carcinogenic.
.

Poisons:
A lot of poison is also used for pest control: to kill ants as well as moles, mice or rats. Especially against the annoying slugs, poisonous grain is widely scattered.  Death sentence also for some cats and dogs.

.
Do amateur gardeners poison the environment

and in the end, poison themselves or others? 

.
Plastic:
Another issue is the use of plastic borders, plastic shrub covers, plastic foils, plastic pots, plastic weed fabric, plastic plant signs, plastic decorations... the list is endless.  No garden needs all this crap.  Not any of these items were used by our grandparents.  And they did a lot more gardening than we do.  Why let the industry and retailers tell us what we need in our gardens?  Why not do as nature does?  Plants existed and thrived forever - without the use of plastic.
.
Conclusion:
Of all the products offered at hardware stores, we need nothing, if we hobby gardeners would create our own compost!  Fruit and vegetable scraps, egg shells, coffee or tea grounds, dry leaves, shredded paper, lint, banana peels... All this creates not only good compost, but it also reduces garbage and helps the environment to produce a lot less methane. It's a greenhouse gas which the U.S. Environmental Protection Agency (EPA) says is 20 times! more damaging to the environment than carbon dioxide (CO2).

Only this way gardens flourish! Not from using pollutants, or buying poisons and plastic rubbish. 


<><><><><>

.


Saturday, January 5, 2019


Plant Hardiness Zones


Will my plants thrive and bloom in the coming years? This is the most important question when purchasing flowers or shrubs for your garden. Always check the label carefully!

Plant Hardiness Zones are the standard by which gardeners and growers can determine which plants are most likely to thrive in their location. Maps are based on the average annual minimum winter temperatures, divided into 10-degree Fahrenheit zones.

Due to the moderating effect which the North Atlantic Current has on the Irish and British temperate maritime climate, Britain, and Ireland even more so, have milder winters than their northerly position would otherwise afford.  This means that the hardiness zones relevant to Britain and Ireland are quite high.  Huge landmasses of the interior in Nord America have a much rougher climate: hot summer and ice-cold winter temperatures.
.


Another phenomenon is that relatively small areas or an island often consist of several hardiness zones. For example, Vancouver Island, north-west of Seattle stretches over four different zones: from Victoria to the Elkhorn Mountain, which rises more than 7,000 feet above the Pacific Ocean.

USDA Plant Hardiness Zones
Maximum lowest temperatures in Fahrenheit
USDA Plant Hardiness Zone Map
https://planthardiness.ars.usda.gov/

5a -20 to -15 F
5b -15 to -10 F
6a -10 to -5 F
6b -5 to 0 F
7a 0 to 5 F
7b 5 to 10 F
8a 10 to 15 F
8b 15 to 20 F
9a 20 to 25 F
9b 25 to 30 F
10a 30 to 35 F
10b 35 to 40 F
11 Above 40 F


European Hardiness Zones can be found here:
https://en.wikipedia.org/wiki/Hardiness_zone#European_hardiness_zones

And here are the Canadian Plant Hardiness Zones:
http://bit.ly/2QsaN4b

.


<><><><><>
.


Sunday, December 30, 2018


Southern Trees - Live Oaks


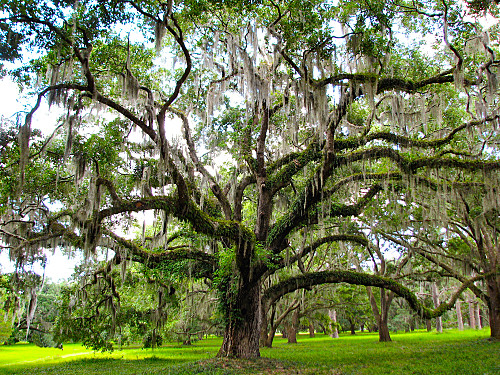
Traveling the Southern States and discovering new trees, shrubs and flowers is such a pleasure!  One of my favored trees down south is the Live Oak, a beautiful, shade-spending, and characterful species.  Spectacular alleys like those in "Gone with the Wind" can be found in many residential neighborhoods in the South!


Live Oak Trees
It is such a pleasure to walk underneath huge Live Oak trees, especially when they are overgrown with silver-green moss.  They are called a "live" oak because it is evergreen, with green foliage year round, rather than going dormant in the winter.

One of the oldest can be found outside of Charleston, South Carolina.
Few trees are as colossal and awe-inspiring as the Live Oak (Quercus virginiana). It's a fast grower, ultimately reaching up to 80 feet tall and 100 feet wide.  The tree in the Angel Oak Park is estimated to be 400-500 years old. It stands 66.5 ft (20 m) tall and measures 28 ft (8.5 m) in circumference.  Thriving in rich, coastal soils and along banks of streams and rivers, moss drapes over its long branches and dances with each breeze.


Live Oak trees' natural habitat is in the States from North Carolina all the way to Texas and from New Mexico up to Oregon - Hardiness Zone 8 and higher.  Their acorns are a sweet attraction to qual, wood ducks, wild turkeys, and whitetail deer.  These and a variety of birds and squirrels nest and make this tree their permanent home.

Live Oaks do best in warm, moist weather.  They also like areas with mild winters.  That makes them perfect for Central Texas.  Live oaks cannot survive prolonged freezing temperatures and icy weather.  The Live Oak does best in soil types that range from well-draining loam to poor-draining clay.  A young live oak needs regular watering.  The best way to water a live oak is to use a drip system for a slow, gradual soaking.


Protect the root zone of a live oak!  You want to limit competition for resources surrounding your live oak.  The best environment for a live oak is one where there is a comfortable root zone (15 ft) that contains mulch.  You may have to remove sod and plants.  You don’t want anything around the tree that can inhibit its growth.


More Sources:
https://en.wikipedia.org/wiki/Quercus_virginiana
http://www.sptreefarm.com/interesting-facts-about-live-oak-trees.html
https://www.fast-growing-trees.com/Live-Oak-Tree.htm
http://www.keepaustingreen.com/care-live-oak/

.
<><><><><>

.

Sunday, December 23, 2018


List of Fabulous Shade Flowers


As longer I garden as more I prefer shade - not only because it is a more pleasant spot to garden in summer.  But also because plants for shade have a more subtle, elegant appearance.  Another great benefit is that flowers which are grown in shade last longer and maintain their color intensity better than those grown in full sun. 


.
You Might Ask:
What perennials, annuals or shrubs can I plant other than Hostas?  Well, there are dozens and dozens of shade-loving plants out there.  See the long list below, that doesn’t even cover those for a warmer climate or the native shade plants.  But first things first, lets start with the soil:


.
Nutritious Soil and Sufficient Water Are a MUST:
No matter where you garden - in shade or sun - your plants will only thrive when you feed them well with the right soil, compost, and regular watering, especially near or beneath trees and large shrubs.  Trees take up all the nutrients and moisture (even prevent rain to reach the soil), so there is nothing left for your attractive flowers - if you don't soak the soil every other day.  A great help is also to cover the soil with mulch to even out temperature difference, avoid weeds and yes, help to reduce watering.
.


Have This List Handy When Shopping for Shade Plants:

PERENNIALS:
Hellebores
Salomon’s Seal
Ladies Mantle
Hostas in blue and yellow
Astilbes: white, red, or pink-flowering
Japanese Ferns
Deadnettle
Spurges (Euphorbia)
Alyssums
Heuchera Copper or Lime
Daffodils
BlueBells
Bleeding Heart


.
Azaleas
Wild Ginger
Pulmonarias (Lungwort)
Siberian Iris
Bigroot Geranium
Anemones
Trout Lilies
Shooting Stars
Trilliums
Foamflowers
Japanese Forest Grass
Primulas
Periwinkle


.
ANNUALS:
Pelargonias
Begonia
Impatiens
Lobelia
Pansies
Coleus
Caladiums


.
SHRUBS:
Mock Orange (Philadelphus)
Hydrangeas (PeeGee, Annabelle, Climbing Hydrangea)
Rosa Glaucia
.


See descriptions and more images for shade plants:
http://garden-dream.blogspot.ca/2016/06/benefits-of-shade-in-your-garden.html
http://garden-dream.blogspot.com/2009/06/new-to-gardening.html
https://www.sunset.com/garden/flowers-plants/shade-plants
.


<><><><><>